July 4, 2026—Today there is a lot of buzz around Anthropic raising usage limits for its AI models and its new SpaceX deal. I resubscribed to my $20/mo Pro plan to check it out. I had been using OpenAI‘s Codex app for the past three months and was fairly satisfied with the results. I’m always ready to switch back to Claude when they finally lower their prices, which they will have to do eventually in light of the very capable and competitive Chinese AI models that cost a fraction of the price of American frontier models.
I moved away from Claude because I was always hitting its arbitrary useage limits. These limits would generally double the cost of my subscription each month, forcing me into a recurring dilemma: buy extra usage or wait up to 4 hours for the limit to reset. Who can work like that? Programmers, writers, and many other thinking users must work when inspiration strikes and creativity flows. Asking us to “wait 4 hours” before we can finish working is tantamount to extortion.

The unfortunate news is that while Anthropic effectively lowered API costs for its “most dedicated customers,” this change does not benefit smaller users on Pro or Max plans (apparently, we are not dedicated enough to receive such discounts). If you are on their Pro or Max plan, there are two small concessions: the rolling 5-hour usage limit has doubled, and peak-hour throttling has been removed for Pro, Max, Team, and seat-based Enterprise plans.
A small update (July 10, 2026)—The AI marketplace moves fast. Within the past week, Claude reintroduced its latest and most powerful model, Fable 5. They are also taking it away again in two days (July 12) and making it available only through API credits, so users on Pro and Max plans will no longer have access.
Today, ChatGPT introduced its newest model, 5.6, which some benchmarks show is better than Fable 5. With all of Anthropic’s bait-and-switch tactics, exorbitant pricing, and decreasing returns relative to cheaper AI models like GLM and ChatGPT, I will not be renewing my Claude subscription. Even if Fable 5 were available going forward, I find this model nearly useless. On two different projects, I received this message:
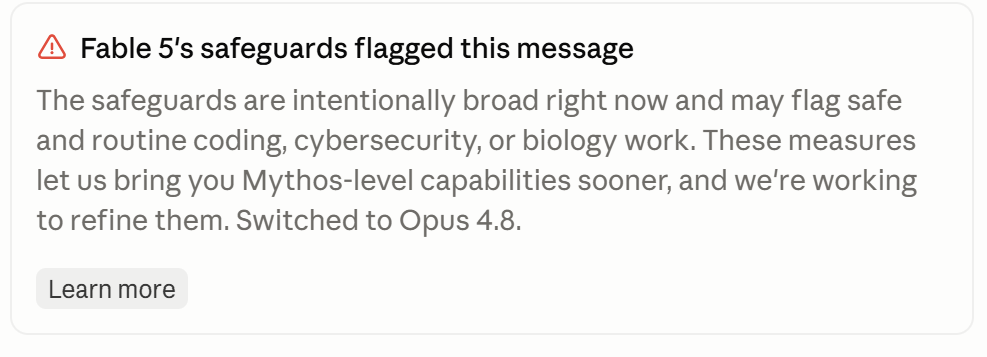
This error automatically demotes you to the less-capable Opus 4.8. WTF. If I wanted to use Opus 4.8, I would have selected it in the first place. How did I trigger this error? Was I asking about making a nuclear bomb? Of course not. Both times I simply had Fable 5 checking over some previously written code for vulnerabilities—the thing that Fable 5 is supposed to excel at. It can’t excel if it refuses to work.
So please, Mr. Anthropic, put Fable 5 behind a forbidding-priced API. Fable 5 will not be missed. It’s an especially astute business decision to give the Chinese and other frontier models time to far surpass Fable 5’s abilities within the next 6 months. Within a year, Anthropic will be the Yahoo of the new “Google era” we are entering with AI. Farewell.
You may read more about these changes on Anthropic’s blog.