SantoHost.com just introduced WordPress One, a no-limits WordPress hosting plan with Cloudflare’s CDN integration. So, I thought it would be a good time to touch on how to speed up your WordPress website.
The biggest problem with WordPress is that it requires more resources than a static website — a lot more! When one first installs WP, it may seem fairly fast. But as you add more and more pages and plugins or change the theme, it literally gets bogged down over time. This scenario is all fine and good if your server can handle the extra stress; however, most servers can’t, and they slow to a crawl.
If you are a professional who depends on your online presence, you need a specialized hosting service that can maintain the computing resources that lend to a speedy website.
So, if your website is too slow, you should consider moving it to a faster hosting service. SantoHost.com offers free WordPress migration. They will move your website to their speedy servers for free, do a malware scan, and update your core files (and the theme if necessary). With managed hosting, you get a lot more for your money than just web hosting. The experts at SantoHost.com will keep your website updated and therefore safe from hackers.
DIY WordPress Tune-Up
I will list a few things the average website owner can do to speed up their WordPress website:
If your website is running slow and your hosting panel has a malware scanner, scan your files for malware. Malware has the potential to significantly slow down your website, as well as cause complete disruption or defacement.
You can replace all of your graphics with the newer Webp format. It will make your images 25% smaller with no degradation. This process can be a big job if you have a lot of images.
Use fewer plugins. Look for plugins that can perform multiple tasks. When choosing plugins, it is typically better to use the more popular ones, as they are more likely to be updated more often; you may have less trouble with them.
I have spent hundreds of hours tweaking WordPress sites for speed. Although the process is never exhausted, adhering to these suggestions will yield the greatest return on your investment.
Finally, I have come to the conclusion that a CDN is essential for excellent pagespeed scores. If your website isn’t broken or malware infested, you will almost certainly need a CDN to achieve the highest pagespeed scores.
When you’re overseas and require access to your banking app, discovering you are blocked out can be quite distressing, if not traumatic.
Error:
Anonymous networkFor security reasons, we do not allow connections from a VPN or proxy. Please disable it and try again. If you are on WiFi, please switch to your mobile network and try again.
How to get Around your Bank’s VPN Block
I will offer three ways that you may access your account abroad.
1) First, contact your bank and tell them that you are abroad. They may be able to unblock access to your account. This step is crucial. If you try to log in using the methods below without first contacting your bank, you may lock yourself out.
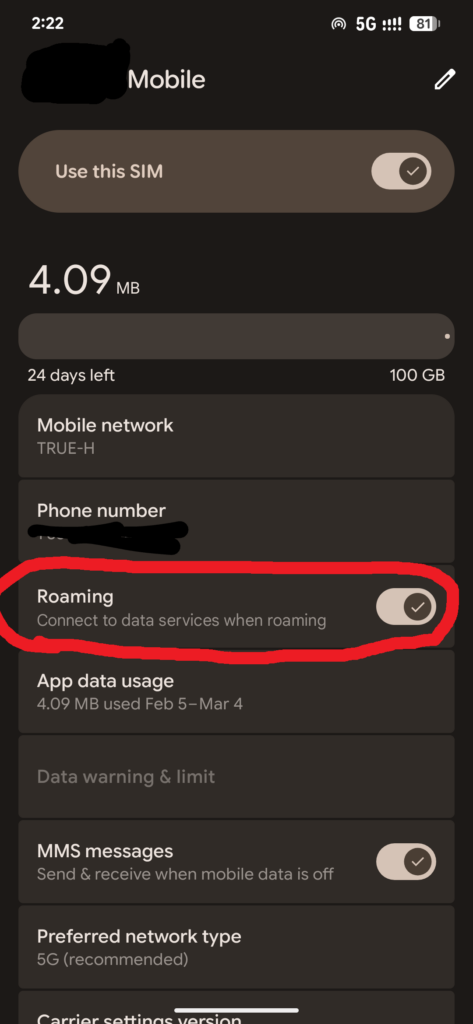
2) If you have your SIM from your country, turn off Wi-Fi and try to use mobile data from your home-based mobile provider. You may have to turn on the roaming feature:
To use this feature, your carrier must allow international roaming, which is often an add-on with additional charges.
3) Use your favorite VPN and give it another shot! I often recommend NordVPN. Or you can try ProtonVPN for free.
Some banking apps are excellent at detecting VPNs and proxies. You can sometimes bypass their firewalls by using a residential proxy located in your home country. I would recommend such usage only for extreme emergencies. Today, I successfully used my banking app with this method. It works, but not 100 percent. I had to try three different IP addresses before I was able to log into my banking app. Third time’s the charm!
I don’t know of any VPSs that offer residential IP addresses, only dedicated IP addresses from a data center.
However, never fear. There are multiple websites that offer residential IPs for rent.
(I do not get a commission from the following links):
Node Maven is where I was able to obtain a residential IP for around $6. I then used an Android proxy client to establish a connection to the IP. The Android app was called Nore Proxy.
Best of luck with your endeavors! A few caveats : NEVER allow an app to install a certificate in order to use a proxy or VPN. Don’t change your email or phone number on your banking app while abroad. You may, and probably will, get your account frozen. This phenomenon actually happened to me once. I changed my phone number while in SE Asia, which resulted in an immediate lockout. I eventually had to fly back to the USA and go meet with a bank manager in person to get access to my money! I was flagged as a hacker, I guess.
VPN services offer a sense of security while being online, but are they worth the hassle and cost? My answer is yes! I find that my VPN is indispensable, especially living and traveling in other countries. For example, I can’t log in to my banking apps from the Philippines, and occasionally the bank even blocks my VPN connection (more about that later). Furthermore, I’m often getting blocked from my own servers because I may type in an incorrect password too many times. With a VPN I can change IP addresses in a second, and boom! I’m back in.
Let’s first make a distinction between proxies and VPNs. The chief difference between a proxy and a VPN is that proxies do not necessarily have encryption. Meanwhile, one expects robust encryption from a VPN provider. The way VPNs work is by encrypting your Internet connection before it leaves your computer. Your internet connection can then pass through your ISP and all sorts of Internet routers with strong encryption. Your data connection will end at a data center, where the VPN provider will decrypt your internet connection and send it back out to the original target.
The VPN data center can be anywhere in the world. Your IP address is swapped with one from the data center (the outgoing connection), so it seems you’re in the state or country of the new IP address. This feature allows you to, for example, “unblock” American Netflix from anywhere in the world.
There are many VPN companies competing for your business. Over and over, you will hear NordVPN is the best. I use it myself and can recommend their service with confidence. I am using their service with a residential IP address in the USA. Now, no company — not Netflix or my bank — can know that I am using a VPN. This is a very cool feature that NordVPN offers. Ultimately, VPNs serve no purpose if the service you are attempting to access blocks you. The big companies (like Netflix & HBO) have the big data center IPs blacklisted. A few companies can get you through without detection. NordVPN is one of the best, with or without the residential IP add-on.
Unblocking isn’t the best feature of VPNs. Privacy is the best part. Have you ever had your credit card number stolen? It literally happened to me three nights ago. That’s why I’m determined to always keep my VPN on. Some of the networks here and popular service apps may not be secure. Anywhere that offers free WiFi, including hotels, is another huge problem. A new trend at hotels is passwordless WiFi, which is unencrypted. A VPN is the best protection from your credit card numbers and other personal information being intercepted.
Finally, I’m not here to sell VPN services. Oh, who am I kidding? If you require a private VPN server, please feel free to send me an email. However, there is a safe and free option that most people are not aware of. Cloudflare offers a fantastic 1111 app that upgrades your DNS and data connections. They use the Wireguard protocol, so this is a legitimate free VPN service; however, you can’t change or choose your location like you can with a major VPN provider. The 1111 app is great for emergencies, like when you find yourself at a public WiFi spot with no data plan.
Lastly, if you want to stay safe on the Internet, never use a “free” VPN app. The reason is simple: no VPN company can offer free VPN services. Ad revenue isn’t nearly enough to support any kind of legitimate VPN service because running a VPN is an expensive endeavor. Many of the “free” VPN apps are known to only be scamware/malware. Good protection isn’t free, but you will find NordVPN to be an excellent value.
There are many topics I didn’t get to cover, like jurisdiction and the evolving politics surrounding VPNs and privacy in general. I fear what could happen if my technical writing crosses over into the political sphere.
You will also need an Http header to advertise your server’s support for http/3
ShellScript
add_headerAlt-Svc'h3=":443"; ma=2592000';
This will go in your Vhost file, as above. For Nginx, it will either go in the Server block or the Location block if you are running a reverse proxy. You need to verify that this header is there, or you have to add it yourself.
3) You will need a domain name and a valid, not self-signed, SSL certificate
4) You will need to use TLS 1.3. It’s sometimes a good idea to force TLS 1.3 as in the first example, adding ssl_protocols TLSv1.3. This is very appropriate, especially if only your own clients will be connecting to the instance, as opposed to a general website.
4) In your firewall, you need to open both TCP and UDP protocols for port 443
HTTP/3 uses UDP, unlike the previous versions of HTTP, which only used TCP. You will need to open TCP and UDP.
5) A modern web browser that supports Http/3 which is nearly all of them.
Also, TLS 1.3 has been available since 1998. I do not even try to support older hardware. Requiring TLS 1.3 enhances security at the expense of a few older clients. If you do not explicitly require TLS 1.3, the client can then downgrade to HTTP/2 or HTTP/0.9, which may allow hackers to take advantage of the vulnerabilities in these older protocols.
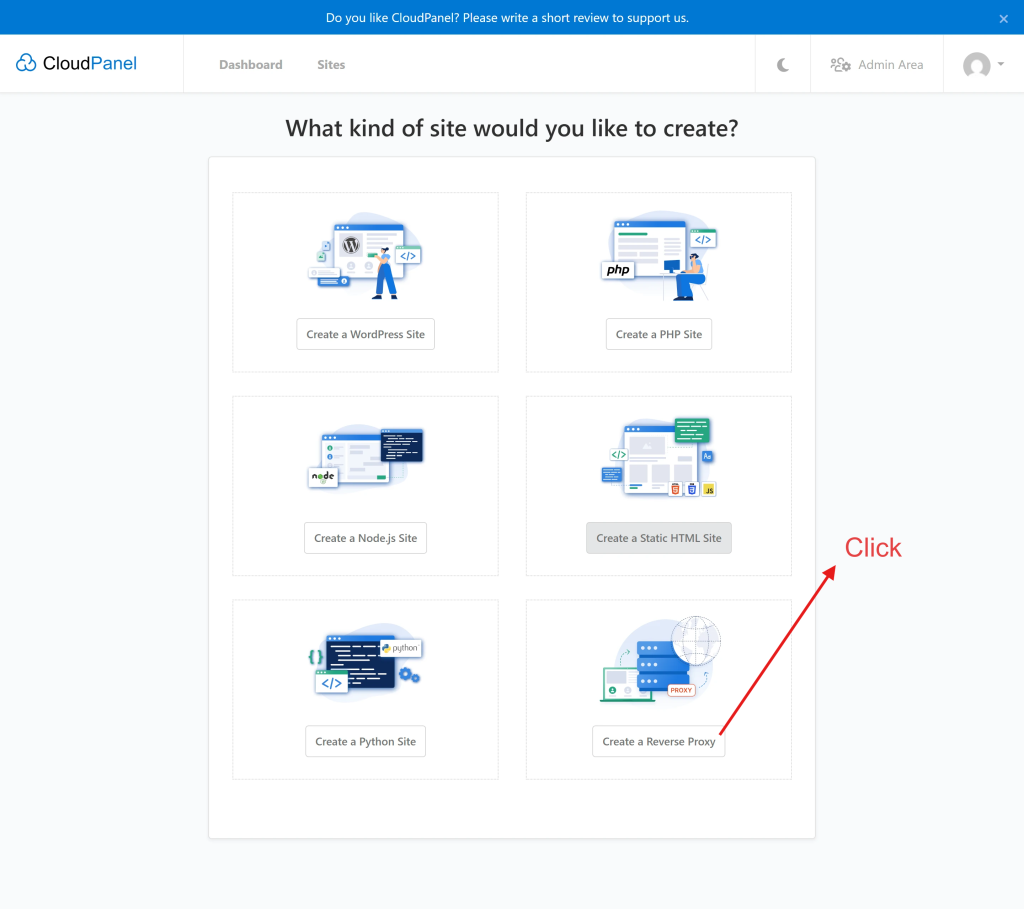
If you’ve ever experienced frustration when attempting to configure a reverse proxy, CloudPanel will simplify your life. CloudPanel is a free, no-frills hosting panel that is surprisingly robust and satisfying to use. It uses the Nginx server, ready for HTTP/3.
The self-hosting movement is in full swing, and CloudPanel is a perfect remedy for those of us who prefer a GUI hosting panel rather than using only the CLI. It excels at reverse proxies, even if—especially if—your project is Dockerized.
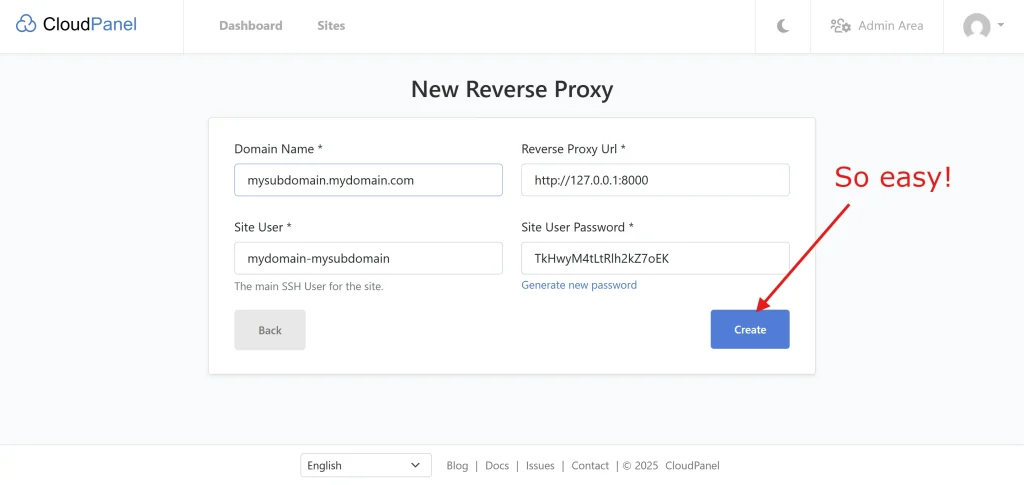
The best thing about CloudPanel is its built-in reverse proxy feature. CloudPanel will even add an SSL (Let’s Encrypt) certificate automatically, or you may import your own cert.
CloudPanel is so easy, in fact, I’m only going to post a few screenshots to explain everything you need to know.
You are halfway there!
Finished!
One final thing, you may want to turn on HTTP/3. Check out my blog post on how to use HTTP/3 in CloudPanel and Nginx.
So, you have installed Immich and are now realizing that it needs a reverse proxy or another method to add some security to your instance. OpenLiteSpeed to the rescue! This tutorial will help you configure OpenLiteSpeed (OLS) with your Immich app.
Immich is a fantastic Google Photos alternative if you are willing to self-host. While LightSpeed is “drop-in replacement for Apache,” OLS is not. OLS is from Mars; Apache is from Venus.
You may be wondering, if OLS is so quirky, then why use it at all? The answer is simple: speed, plus the fact that it is free. OLS supports HTTP/3, which will speed up our Immich instance immensely. For the record, Nginx also supports HTTP/3. Apache reportedly has an HTTP/3 module in development, but I can’t find the beta version anywhere at the time of writing.
Another reason to use OLS is because CyberPanel, a companion web hosting panel, is free (with frustrating adverts). It’s excellent for hosting a few websites free of charge. Not only will you get the speed of HTTP/3, but also a free SSL certificate, which is required for HTTP/3.
To make things a bit easier, you can create your website’s config files (vhost) using your hosting panel and install the corresponding SSL certificate using your (sub)domain. This way, we don’t have to create the website’s vhost configuration file from scratch.
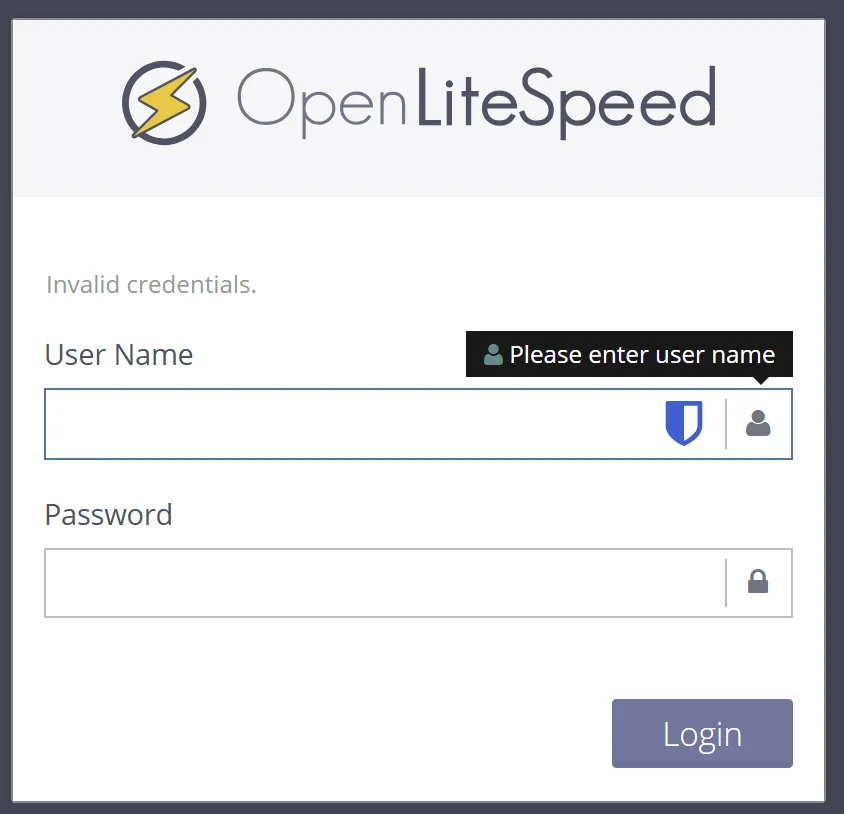
We have two methods to configure OLS: the OLS admin control panel or by editing the config files directly. OLS has a dedicated admin panel, which you will find hidden on port 7080, i.e., https://myserver.mydomain.com:7080. The username should be admin. If you have forgotten your password, SSH into your server and issue
OLS forgotten password
ShellSession
/usr/local/lsws/admin/misc/admpass.sh
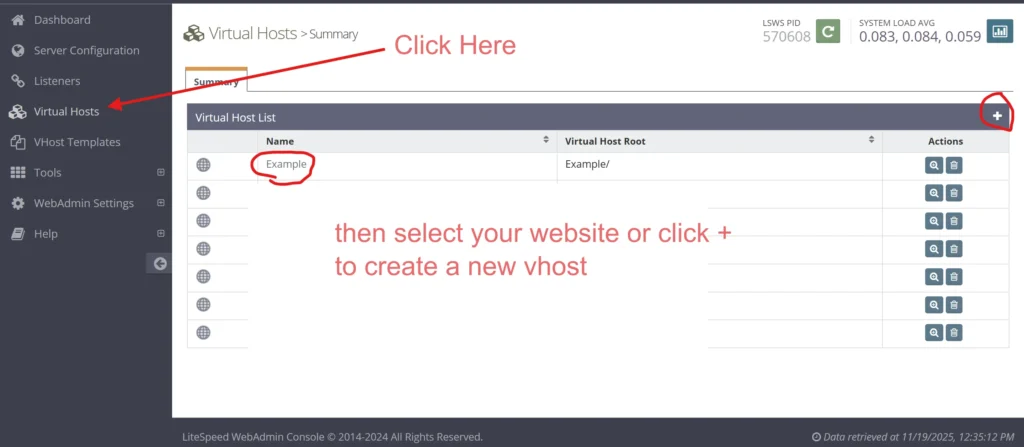
After you log in, click on Virtual Hosts. If you are starting from scratch, click on the + sign to create a new vhost. Otherwise, find and click on the website that you have already created for your Immich app.
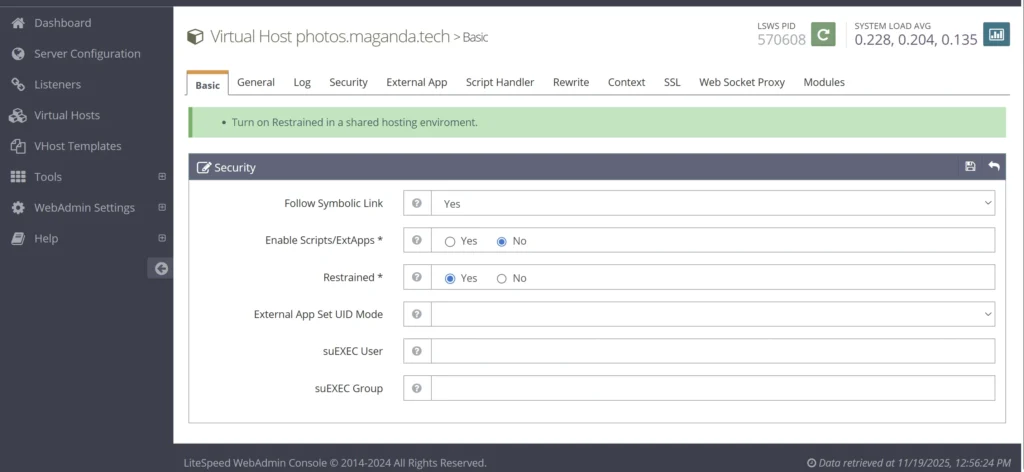
Under the Basic tab, select NO to Enable Scripts/ExtApps, and then select YES to Restrained.
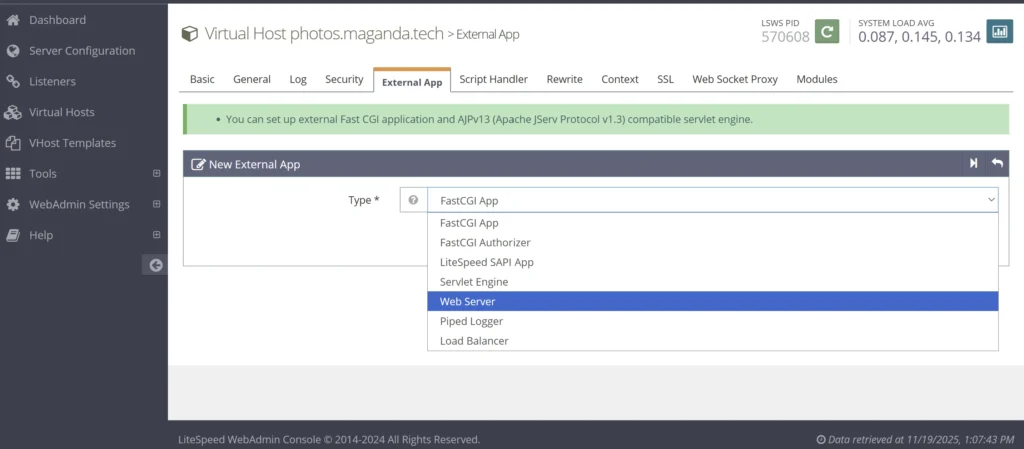
Next, select External App and select Web Server
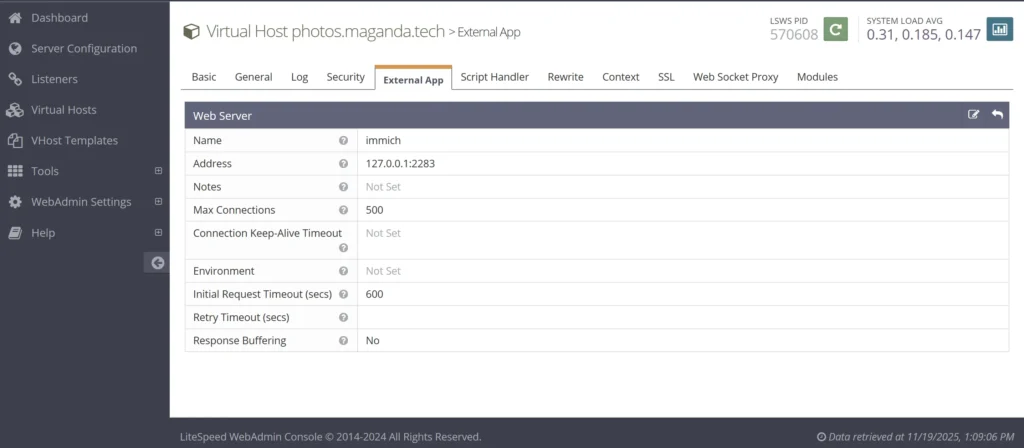
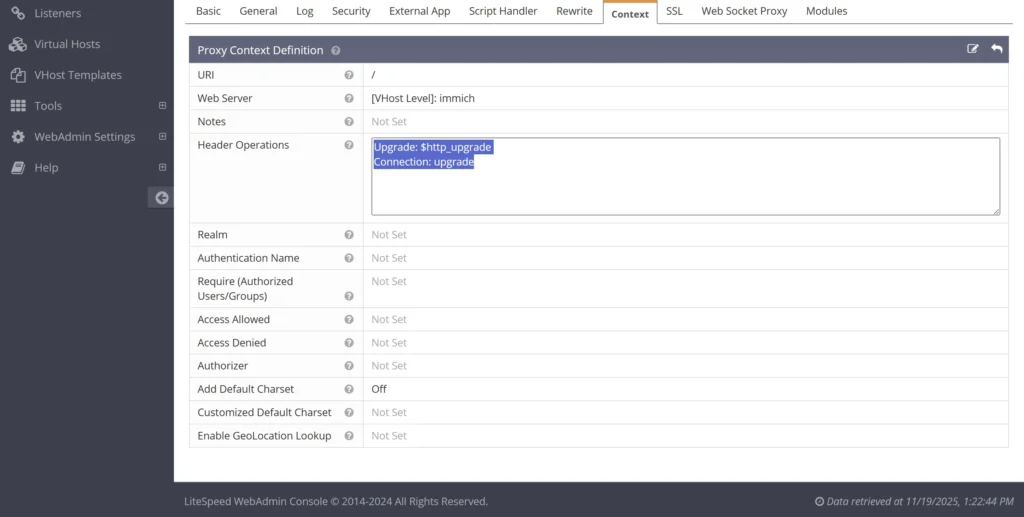
Add 127.0.0.1:2283 for the web server address and provide your web server a name. You can use the information listed below. Click save.
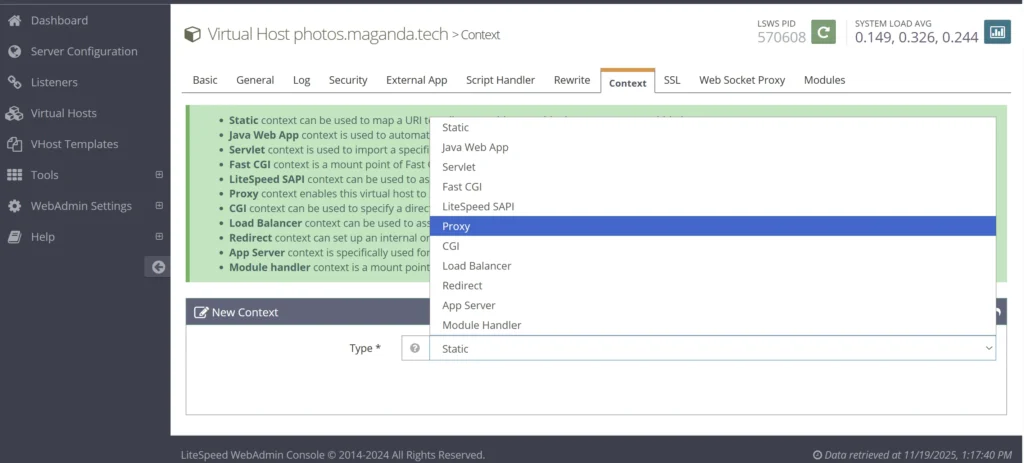
Click on Context, then create a new Proxy —click on Next
Enter / for the URL,
Upgrade: $http_upgrade Connection: upgrade
For the Header operations. Click save.
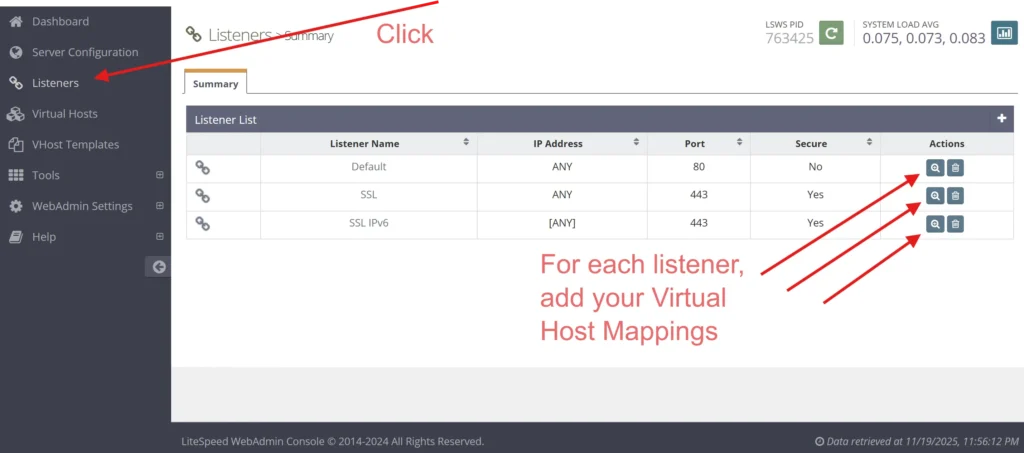
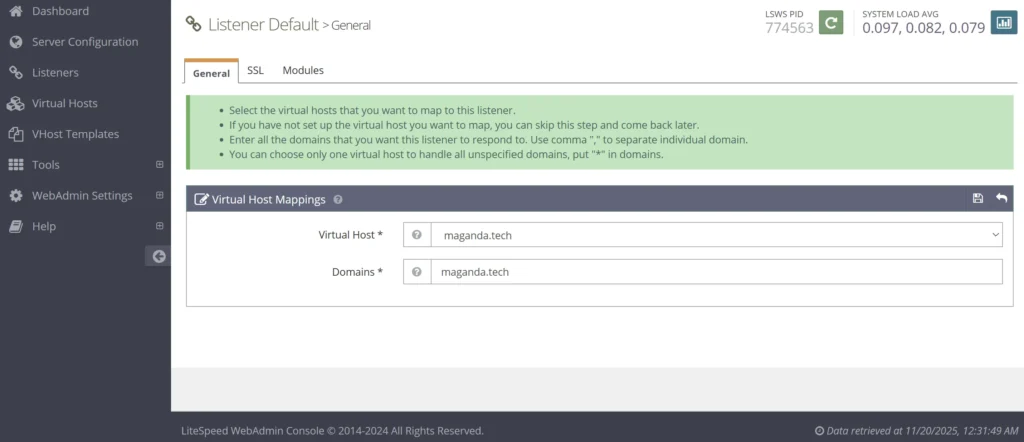
Click on Listeners, then add your virtual host to each listener type.
Our Immich virtual host would need to be added to all three listener types in the above example.
Finally, you need to restart the OpenLiteSpeed server. Look for the big green button at the top and restart OLS. That’s it!
Another word about listeners. If you’re a keen observer, you’ve likely noticed that my configuration lacks the IPV6 listener for the default port. If your system doesn’t have IPV6, then you probably only have two listeners. If you are using IPV6, you should generally have 4 listeners. Even your mail servers need IPV6. We can see here that CyberPanel seemed to forget my IPV6 for the default port. Is it a bug or a feature? I had to add this manually.
Here is the final vhost config for OLS. I assume that you can simply use this config instead of going through all of the above steps with the OLS admin panel… but I don’t know for sure. Please let me know in the comments what you think!
This is a lot of work for a simple reverse proxy. CloudPanel has a built-in reverse proxy, and so does AApanel, my favorite open-source hosting panel. For the record, I have given up on CyberPanel. The project appears to be all but abandoned, and there are too many adverts on the admin panel to make it usable or any bit enjoyable.