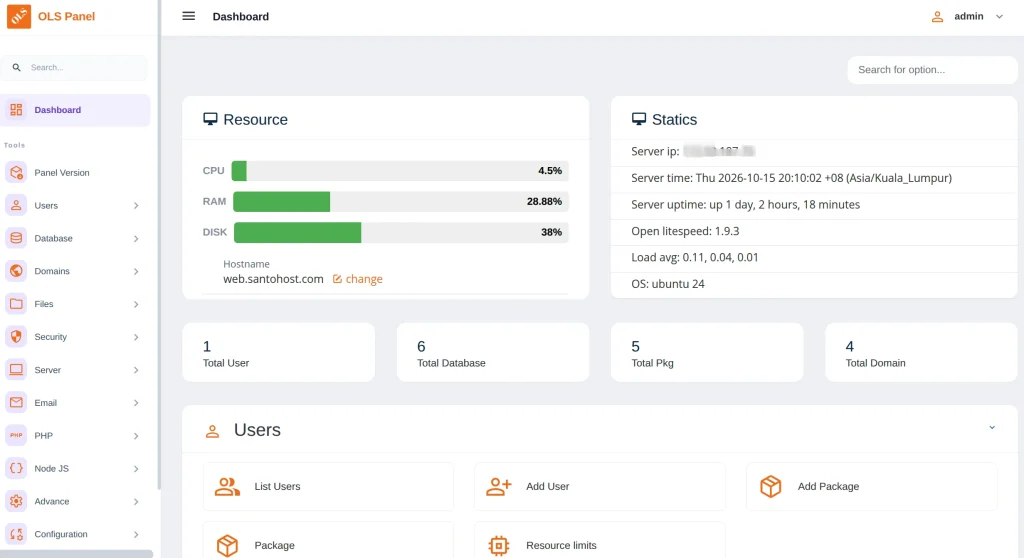
First off, if you are using CyperPanel and are sick of the ads, then OLSPanel (hereinafter referred to as “OLS”) is a panel you can give a try.
I did, however, have some problems with OLS. First, it has an “htaccess” plugin that is supposed to make it more compatible with Apache. The plugin bricked every website on the server. There is no reseller feature, and finding simple menus, like to change 2FA, is not easy. There is also no way to separate admins from customers in the login process. In other words, the admin can’t just change the admin login URL which I typically do with Tailscale (I block it, actually).
If you are running WordPress and want a full-featured hosting panel, you could try OLSPanel. OLS has come a long way in two years. It reminds me of Webuzo, just toned down a bit. This hosting panel really surprised me with all of its features, especially the WordPress manager, which I found very useful.
Under the hood, of course, we have the Open Light Speedweb server bringing the unbeatable LSCache to speed up any WordPress installation. If you run WordPress, this is definitely the hosting panel you want to try.
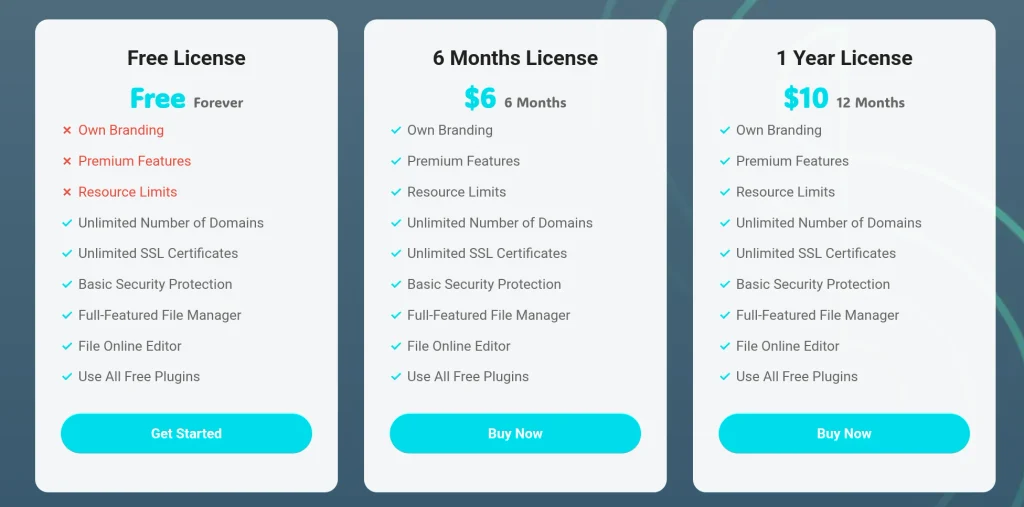
Although the software is open source, you’ll still be paying something to use it. It’s cheap enough, but not free.
Pricing
The best thing about this panel is the OLS server; however, it does not seem to be configured correctly out of the box. Http/3 quic would not work (firewall), and I had many errors about missing browser headers. This is especially odd since I use the built-in WordPress install app.
I guess you get what you pay for. But this project is coming together beautifully, like its GUI.
I use NordVPN occasionally, so I wanted it to stay completely stopped until I chose to launch it. Before making this change, I measured roughly 0.5 GB of memory use while NordVPN was idle. Memory use will vary by system and version, but that was enough to make me investigate.
Turning off NordVPN’s Auto-connect setting was impossible since there isn’t one, at least in the Linux version. That setting controls whether it connects to a VPN server; the background service can still start with the computer. Not only can you not stop the app from auto-starting, there is no way through the GUI to close it down (even though it does have a close button). NordVPN seems to want to take over your computer once installed.
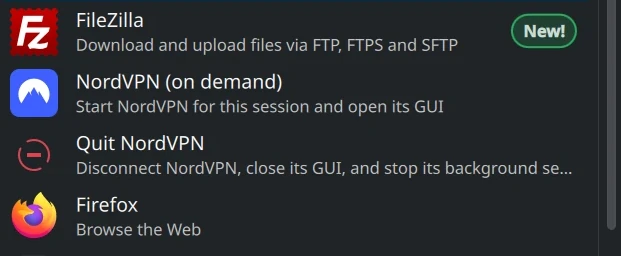
My solution was to disable its boot services and create a NordVPN (on demand) launcher. The launcher starts the background service, waits for it to become ready, and opens the GUI. It never enables startup at boot.
I used this approach on Fedora 44 KDE with NordVPN 5.4.1. The service commands also apply to installations on Ubuntu or Kubuntu that use the same systemd units.
1. Check your installation
This guide assumes you already have NordVPN’s native Linux application and GUI installed.
On my Fedora installation, the GUI command was /usr/bin/nordvpn-gui, and the units were:
nordvpnd.service: the background daemon.
nordvpnd.socket: the socket through which applications contact it.
Both matter. Leaving the socket running can allow an application contacting NordVPN to activate the daemon again.
2. Disable automatic connections and stop boot startup
While NordVPN is still running, turn off automatic VPN connections:
Bash
nordvpnsetautoconnectoff
If you want ordinary internet access while NordVPN is stopped, also disable its kill switch:
Bash
nordvpnsetkillswitchoff
Disabling the kill switch allows traffic to use your regular connection when the VPN is unavailable. NordVPN documents these settings in its Linux application guide. Now disconnect, close the GUI, and disable both boot units:
If your installation includes the kill-switch helper, stop that too:
Bash
sudosystemctlstopnordvpnd-killswitch.service
An older package may report that the helper does not exist.
The --now option stops the units immediately as well as disabling boot startup. A later systemctl start runs them for the current session without enabling them for future boots. systemd documentation
This procedure does not disable Fedora’s firewalld or require disabling NordVPN’s own firewall.
3. Prevent the GUI from launching at login
System services and desktop login startup are separate mechanisms.
For the standard NordVPN desktop filenames, create user-level autostart overrides:
Also check System Settings → Autostart for any separately named NordVPN launcher you previously added. Remove or disable it. Close NordVPN before logging out so KDE does not retain it as part of a session you intend to restore.
4. Create the on-demand script
Create a directory for your personal launcher:
Bash
mkdir-p"$HOME/.local/bin"
Then create the script:
Bash
cat > "$HOME/.local/bin/nordvpn-on-demand" <<'EOF'#!/usr/bin/env bashset -euo pipefailfail() { /usr/bin/kdialog --error "$1" \ --title 'NordVPN (on demand)' || true exit 1}if ! /usr/bin/systemctl is-active --quiet nordvpnd.service || ! /usr/bin/systemctl is-active --quiet nordvpnd.socket; then /usr/bin/pkexec /usr/bin/systemctl start \ nordvpnd.socket nordvpnd.service || fail 'NordVPN could not be started.'fi# Wait for the daemon's API before opening the GUI.for ((attempt = 0; attempt < 30; attempt++)); do if /usr/bin/timeout 2s /usr/bin/nordvpn settings \ >/dev/null 2>&1; then exec /usr/bin/nordvpn-gui "$@" fi sleep 1donefail 'NordVPN started, but its API did not become ready. Check systemctl status nordvpnd.service.'EOFchmod+x"$HOME/.local/bin/nordvpn-on-demand"
The script requests administrator authentication through KDE when the service needs starting. It opens the GUI as your normal user.
The readiness check is intentional: a service can be running before its API is ready to accept requests.
5. Add it to KDE’s application menu
Create a menu entry:
Bash
mkdir-p"$HOME/.local/share/applications"cat > "$HOME/.local/share/applications/nordvpn-on-demand.desktop" <<EOF[Desktop Entry]Type=ApplicationVersion=1.0Name=NordVPN (on demand)Comment=Start NordVPN for this session and open its GUIExec="$HOME/.local/bin/nordvpn-on-demand"Icon=nordvpn-guiTerminal=falseCategories=Network;EOF
Search KDE’s application menu for NordVPN (on demand). Use this entry instead of the original NordVPN launcher, and pin it if convenient.
If NordVPN suggests running:
Bash
sudosystemctlenable--nownordvpnd
skip that suggestion. It would enable boot startup again.
6. Verify that NordVPN is really stopped
These commands inspect systemd and running processes without contacting NordVPN’s API:
Repeat these checks after reboot to confirm the setup. Avoid using nordvpn status to verify that nothing is running: it contacts the API and could activate the daemon if the socket is listening.
Stopping NordVPN after using it
Closing the GUI can leave the background daemon running. To stop it immediately:
Stop the kill-switch helper too if your installation includes it.
Otherwise, shutdown stops the daemon, and the disabled units stay off at the next boot. Check their status again after NordVPN package updates, since installers can change service configuration.
This gives me the behavior I wanted: NordVPN stays installed and available, but its background processes run only when I choose to start them.
July 4, 2026—Today there is a lot of buzz around Anthropic raising usage limits for its AI models and its new SpaceX deal. I resubscribed to my $20/mo Pro plan to check it out. I had been using OpenAI‘s Codex app for the past three months and was fairly satisfied with the results. I’m always ready to switch back to Claude when they finally lower their prices, which they will have to do eventually in light of the very capable and competitive Chinese AI models that cost a fraction of the price of American frontier models.
I moved away from Claude because I was always hitting its arbitrary useage limits. These limits would generally double the cost of my subscription each month, forcing me into a recurring dilemma: buy extra usage or wait up to 4 hours for the limit to reset. Who can work like that? Programmers, writers, and many other thinking users must work when inspiration strikes and creativity flows. Asking us to “wait 4 hours” before we can finish working is tantamount to extortion.
The unfortunate news is that while Anthropic effectively lowered API costs for its “most dedicated customers,” this change does not benefit smaller users on Pro or Max plans (apparently, we are not dedicated enough to receive such discounts). If you are on their Pro or Max plan, there are two small concessions: the rolling 5-hour usage limit has doubled, and peak-hour throttling has been removed for Pro, Max, Team, and seat-based Enterprise plans.
A small update (July 10, 2026)—The AI marketplace moves fast. Within the past week, Claude reintroduced its latest and most powerful model, Fable 5. They are also taking it away again in two days (July 12) and making it available only through API credits, so users on Pro and Max plans will no longer have access.
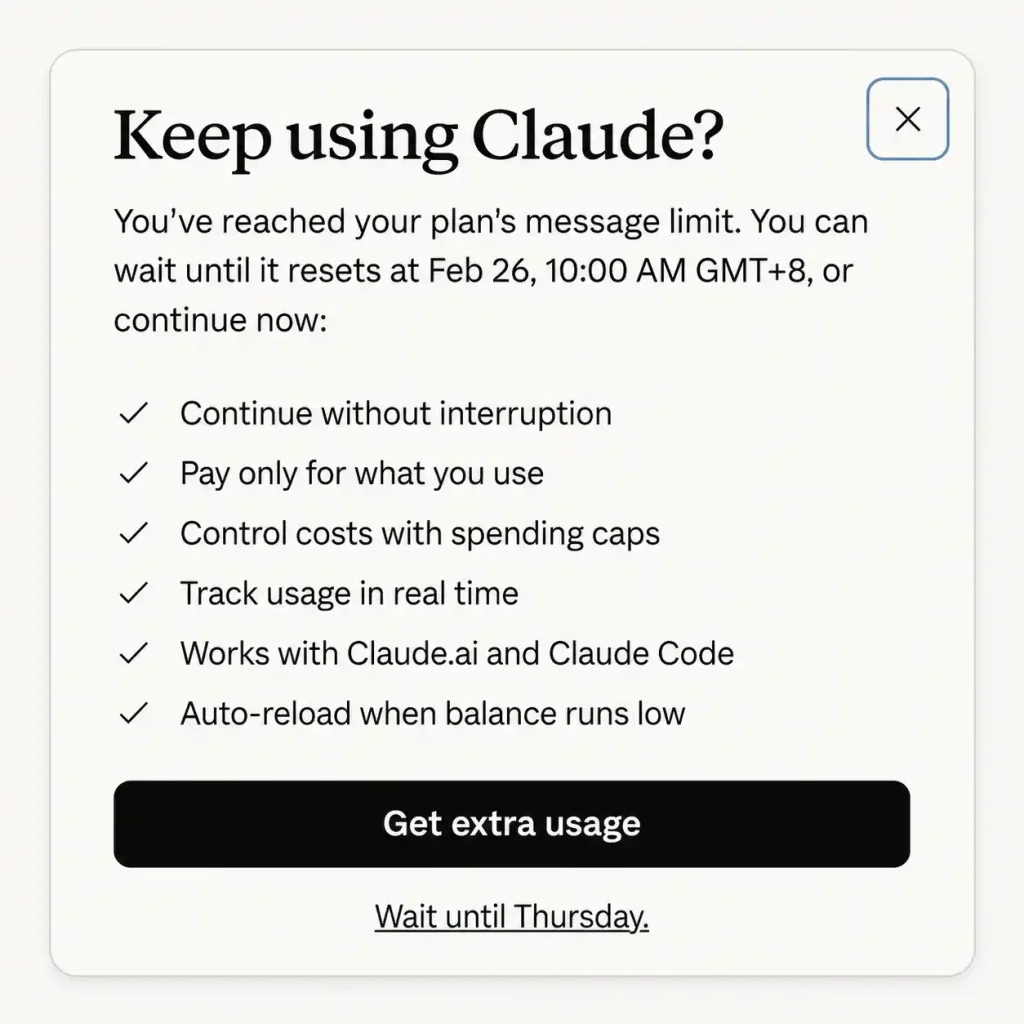
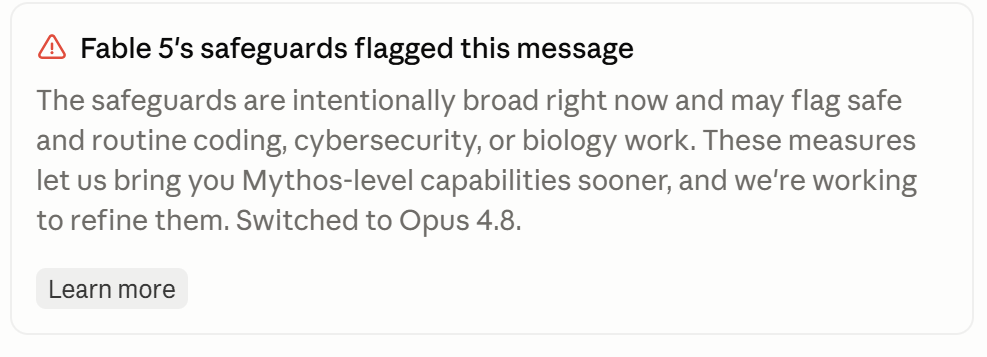
Today, ChatGPT introduced its newest model, 5.6, which some benchmarks show is better than Fable 5. With all of Anthropic’s bait-and-switch tactics, exorbitant pricing, and decreasing returns relative to cheaper AI models like GLM and ChatGPT, I will not be renewing my Claude subscription. Even if Fable 5 were available going forward, I find this model nearly useless. On two different projects, I received this message:
This error automatically demotes you to the less-capable Opus 4.8. WTF. If I wanted to use Opus 4.8, I would have selected it in the first place. How did I trigger this error? Was I asking about making a nuclear bomb? Of course not. Both times I simply had Fable 5 checking over some previously written code for vulnerabilities—the thing that Fable 5 is supposed to excel at. It can’t excel if it refuses to work.
So please, Mr. Anthropic, put Fable 5 behind a forbidding-priced API. Fable 5 will not be missed. It’s an especially astute business decision to give the Chinese and other frontier models time to far surpass Fable 5’s abilities within the next 6 months. Within a year, Anthropic will be the Yahoo of the new “Google era” we are entering with AI. Farewell.
You may read more about these changes on Anthropic’s blog.
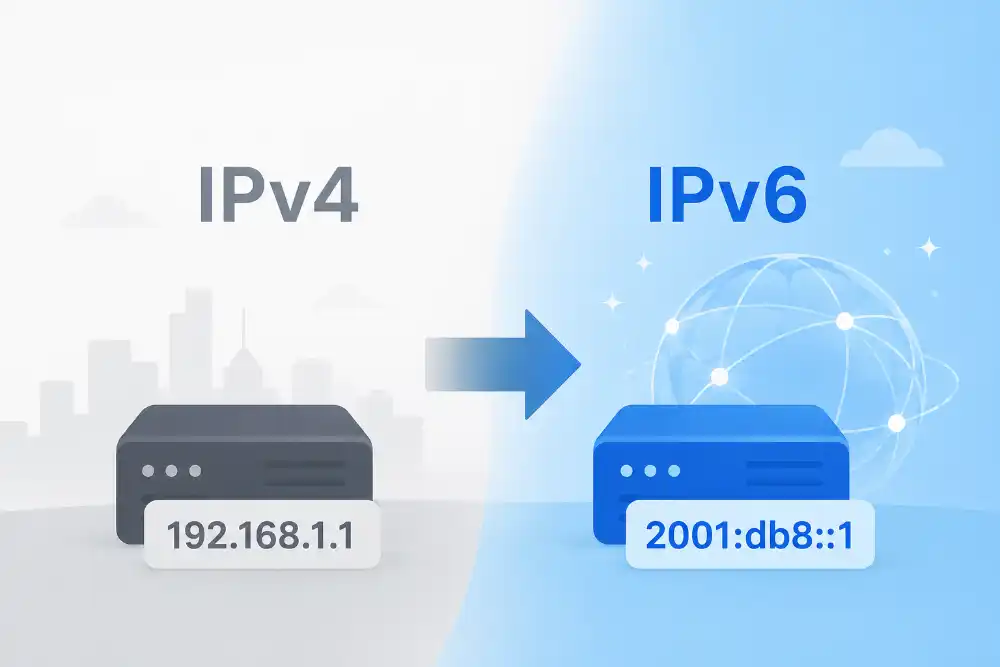
When we think of IP addresses, they are the familiar xxx.xxx.xxx addresses. These are IPv4 addresses and are now in short supply. The scarcity is driving up the prices of IPv4 addresses. To remedy this, IPv6 was introduced in 1995. These new addresses will never run out. In fact, my dedicated server came with a free subnet of IPv6s — that’s 18.4 quintillion free IPs! This is in contrast to the $3 per IPv4 that they charge me! I can only afford 5 old-school IPs Wait a second, did you know that my free IPv6 subnet has 2.3 billion IPs per man, woman, and child alive today? Gosh, I wish I had that many customers. This figure just shows, in dramatic terms, how scarce IPv4s are now compared to the newer IPv6s. IPv4s are exhausted.
Some websites are already IPv6 only, while some residential ISPs do not yet support IPv6. Customer using an IPv4 only ISP can not directly reach an IPv6-only website.
Thankfully, there is a quick and free solution. Cloudflare offers the free Warp app. It’s really an underrated app. Not only does it add IPV6 to your devices, but it also has a built-in VPN to make your communication more private. Last but not least, it does what it is advertised to do… encrypts your DNS queries for extra privacy. This app should cost $5 a month but is absolutely free for basic functionality. They have a version of WARP for every OS out there, including mobile versions.
Maybe it’s not a secret that Cloudflare is one of my favorite tech companies. I will warn you; if you owe them a dollar, they will cut off all your services. It happened to me since I was using the Google login. I use Google login but never use Gmail; therefore, I didn’t get an invoice. My Gmail literally has 10 thousand spammy emails. I don’t even bother deleting them. I just let them accumulate.
For developers, you can use a Cloudflare tunnel via IPV6 to connect to your server (orange cloud magic). Your customers can connect to Cloudflare with IPv4 or v6, as always, and reach your IPv6-only website. Google informs me that outbound traffic from your IPv6-only server can use a NAT64 gateway, if available, or by using Cloudflare WARP. I didn’t know Warp could be installed on a server. So all outbound IPV6 traffic can go to any IPv4 or IPv6 device through WARP. I will check into that instead of purchasing any additional IPv4s. Who knew?
I would love to hear about other ways to move away from IPv4s. WARP may be one way, and it’s better than creating a reverse proxy on your server with only one outbound IPv4, which I’ve done before. I like to keep things simple. Routing 8 VM’s through one reverse proxy is networking gymnastics. Paying $3 per month for an IPv4 is — well it’s market value, what can I say except get ready to move to IPv6 only asap. Do it before $3/mo turns into $25/mo. If the adoption of IPv6 stays very slow, the price of an IPv4 may very well skyrocket.
Furthermore, for the nerds out there, every DNS IPv4 entry needs a corresponding AAA (IPv6) entry, yes, even your MX record. Request that IPv6 subnet be installed on your server and get ready for the future!
Trying to find the cheapest SMTP and POP/IMAP email service? Here is my top 5 list!
There is a certain satisfaction from hosting your own mail server. Over the past 15 years or so, hosting an email server has gone from trivial to very complex. It’s nearly always better to use a cheap email service rather than to host yourself. I have a short list of some of my favorite low-cost email providers.
If your website only needs to send only outbound email, you really only need an SMTP provider. Many of the big bulk-email providers offer free outgoing email for up to thousands of emails per month. Check out Brevo or Maileroo and you are done. Both companies make it easy to set up outgoing email.
But this article is about full-featured email providers. Most websites need to send AND receive emails. At Maganda, we want cheap! Here are some of our favorite cheap email providers, in order, from worst to best:
Top Five
ZoHo Email: ZoHo creates beautiful, impressive, and well-thought-out apps. I can’t think of anything that ZoHo doesn’t offer. It offers business email for around $1/mo. It’s also excellent! However, I do not recommend this company at all. Take, for example, their email system. It’s so over-engineered that figuring out how to use it may drive users to tears. Even if you correctly set up SMTP, their finicky system may still not work for you. One pro: This provider is the only company on the list with its own custom mobile email app.
Openprovider: Offers business email for less than $1/month; however, it tries to upsell something called “EASYDMARC” for nearly $7 a month. It smells scammy. In any case, I couldn’t get their product to work at the time of writing; it appears to be buggy. But for only 70 pennies a month, you might want to give it a try. The UI seemed to be somewhat buggy. I didn’t bother testing if their email system actually worked. It probably does.
Namecheap is known for their low-margin products and services. Their business email starts around $15/yr. It is worth checking out. It’s been a few years since I tried their email service, but I can vouch that it is legit, and I had no problems with it.
Purelymail: If you need unlimited everything (especially domains), then give them a try. The UI isn’t fancy, but I had no problems setting up working email with them. Their service is really only for experts/developers for now—until they offer a more polished UI. This service is a winner for their honest pricing and unlimited domains. At $10/yr, it outshines all of its competitors.
Mailafiniti: I’m actually using this service now. For $15/yr, they offer a very polished interface. The one problem I see with them is they aren’t completely clear about the terms. Before I purchased a plan, their chatbox told me that I could host as many domains as I wanted. Indeed I can, but each additional domain is $15. After fighting with ZoHo mail for days, I will just feel relieved if their service works well for me. If not, I will check out Purelymail again.
Update: Mailafiniti replied gracefully to this article:
“
I’d love to clear up the pricing: Mailafiniti does not charge per domain. You can connect as many domains as you like at no extra cost. Our pricing is based purely on the number of email accounts (mailboxes) you create, nothing else.
So if you connect 5 domains but only create 2 mailboxes, you only pay for those 2 mailboxes. That’s it. Plans start at $1.25/user/month (billed annually) with 10GB storage per mailbox.
It sounds like our chatbot communicated this poorly, that’s on us, and something we’re fixing. I’m sorry it caused frustration before you purchased.
”
Conclusion
I requested a refund from Mailafiniti because of the misunderstanding about the number of domains supported. I have a lot of domains. At this time, you can add 100+ domains, but they all forward to the same main mailbox email address. Therefore, you need a new “mailbox” ($15/yr) for each domain if you need full customization for. So I went back to Purelymail and to my delight, they had revamped their UI just last week! The UI is now easy to use and more polished, and everything just works. My emails are going out without any fuss at all (i.e., auth errors).
I’m trying to run a business here. I don’t have time to fight with or debug other people’s email systems, nor do I want to be taken advantage of due to misleading or missing terms of service. Purelymail clearly wins here with its generous $10/yr tier. If you only have one domain to deal with, you should not overlook Mailafiniti’s superior UI; they have some talented coders over there.
PS: I do not get a commission from any links within this article.
SantoHost.com just introduced WordPress One, a no-limits WordPress hosting plan with Cloudflare’s CDN integration. So, it’s a good time to touch on how to speed up your WordPress website.
The biggest problem with WordPress is that it requires more resources than a static website — a lot more! When one first installs WP, it may seem fairly fast. As you add more and more pages, plugins, or change the theme, WordPress literally becomes bogged down over time. This scenario is acceptable if your server can handle the additional stress; however, most servers cannot, resulting in a significant slowdown.
If you are a professional who depends on your online presence, you need a specialized hosting service that can maintain the computing resources that lend themselves to a speedy website.
So, if your website is too slow, you should consider moving it to a faster hosting service. SantoHost.com offers free WordPress migration. They will move your website to their speedy servers for free, do a malware scan, and update your core files (and the theme if necessary). With managed hosting, you get a lot more for your money than just web hosting. The experts at SantoHost.com will keep your website updated and therefore safe from hackers.
DIY WordPress Tune-Up
I will list a few things the average website owner can do to speed up their WordPress website:
If your website is running slow and your hosting panel has a malware scanner, scan your files for malware. Malware has the potential to significantly slow down your website, as well as cause complete disruption or defacement.
You can replace all of your graphics with the newer Webp format. It will make your images 25% smaller with no degradation. This process can be a big job if you have many images. Major graphics apps like Affinity allow you to choose between lossless and lossy webp formats. Lossless means no degradation of the image, but it should generally not be used for the web. Use lossy; you can choose the amount of quality you are willing to sacrifice to have smaller images. I have found that using lossy compression at 75-85 percent quality is so effective that the webp format is indistinguishable from the original and reduces the image size to one third of its original size.
Use fewer plugins. Look for plugins that can perform multiple tasks. It’s usually best to use popular plugins, as they’re more likely to be updated and cause fewer issues.
I have spent hundreds of hours tweaking WordPress sites for speed. Although the process is never exhausted, adhering to these suggestions will yield the greatest return on your investment.
Finally, I have come to the conclusion that a CDN is essential for excellent pagespeed scores. A cheap and easy way to speed up your WordPress website is to use Cloudflare’s APO plugin. This service costs $5 per month but achieves full-page caching around the world (which is especially great if you have international clients).
Another factor is page-caching plugins. WordPress has dozens of them, some free of charge. I’m nearly ready to release my WordPress plugin, SantoCache (because, of course, we need yet another one). These types of plugins can significantly improve the load time of your website. But this is a topic for another day. After I release my plugin, I can explain how these types of plugins can speed up your website, which a typical WordPress user can’t do.
VPN services offer a sense of security while being online, but are they worth the hassle and cost? My answer is yes! I find that my VPN is indispensable, especially living and traveling in other countries. For example, I can’t log in to my banking apps from the Philippines, and occasionally the bank even blocks my VPN connection (more about that later). Furthermore, I’m often getting blocked from my own servers because I may type in an incorrect password too many times. With a VPN I can change IP addresses in a second, and boom! I’m back in.
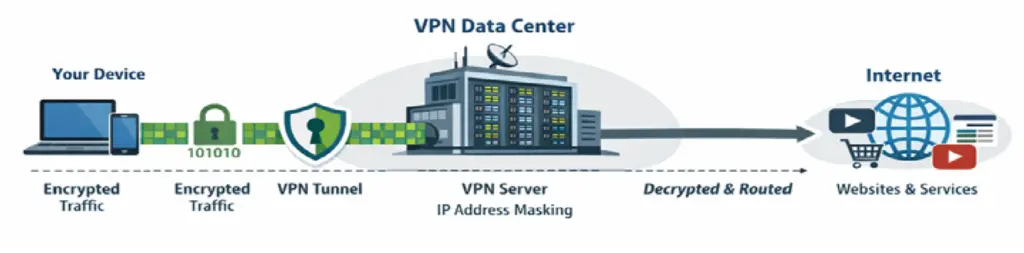
Let’s first make a distinction between proxies and VPNs. The chief difference between a proxy and a VPN is that proxies do not necessarily have encryption. Meanwhile, one expects robust encryption from a VPN provider. The way VPNs work is by encrypting your Internet connection before it leaves your computer. Your internet connection can then pass through your ISP and all sorts of Internet routers with strong encryption. Your data connection will end at a data center, where the VPN provider will decrypt your internet connection and send it back out to the original target.
The VPN data center can be anywhere in the world. Your IP address is swapped with one from the data center (the outgoing connection), so it seems you’re in the state or country of the new IP address. This feature allows you to, for example, “unblock” American Netflix from anywhere in the world.
There are many VPN companies competing for your business. Over and over, you will hear NordVPN is the best. I use it myself and can recommend their service with confidence. I am using their service with a residential IP address in the USA. Now, no company — not Netflix or my bank — can know that I am using a VPN. This is a very cool feature that NordVPN offers. Ultimately, VPNs serve no purpose if the service you are attempting to access blocks you. The big companies (like Netflix & HBO) have the big data center IPs blacklisted. A few companies can get you through without detection. NordVPN is one of the best, with or without the residential IP add-on.
Unblocking isn’t the best feature of VPNs. Privacy is the best part. Have you ever had your credit card number stolen? It literally happened to me three nights ago. That’s why I’m determined to always keep my VPN on. Some of the networks here and popular service apps may not be secure. Anywhere that offers free WiFi, including hotels, is another huge problem. A new trend at hotels is passwordless WiFi, which is unencrypted. A VPN is the best protection from your credit card numbers and other personal information being intercepted.
Finally, I’m not here to sell VPN services. Oh, who am I kidding? If you require a private VPN server, please feel free to send me an email. However, there is a safe and free option that most people are not aware of. Cloudflare offers a fantastic 1111 app that upgrades your DNS and data connections. They use the Wireguard protocol, so this is a legitimate free VPN service; however, you can’t change or choose your location like you can with a major VPN provider. The 1111 app is great for emergencies, like when you find yourself at a public WiFi spot with no data plan.
Lastly, if you want to stay safe on the Internet, never use a “free” VPN app. The reason is simple: no VPN company can offer free VPN services. Ad revenue isn’t nearly enough to support any kind of legitimate VPN service because running a VPN is an expensive endeavor. Many of the “free” VPN apps are known to only be scamware/malware. Good protection isn’t free, but you will find NordVPN to be an excellent value.
There are many topics I didn’t get to cover, like jurisdiction and the evolving politics surrounding VPNs and privacy in general. I fear what could happen if my technical writing crosses over into the political sphere.
change http3 to on; I understand that https/3 defaults to on when compiled with the http/3 module, but I always add it anyway. It lets you remember later on that this website is intended to be upgraded to http3.
You will also need an Http header to advertise your server’s support for http/3
ShellScript
add_headerAlt-Svc'h3=":443"; ma=2592000';
This will go in your Vhost file, as above. For Nginx, it will either go in the Server block or the Location block if you are running a reverse proxy. You need to verify that this header is there, or you have to add it yourself.
A little trick I have learned if you are having trouble getting Http/3 to be stable is to add the directive reuseport to the quic listeners like so:
Of course “listen [::]” is the listener for 1Pv6 connections. If you are not using IPv6, you should just leave them in there for future upgrades — or delete them now for easier debugging. The choice is yours.
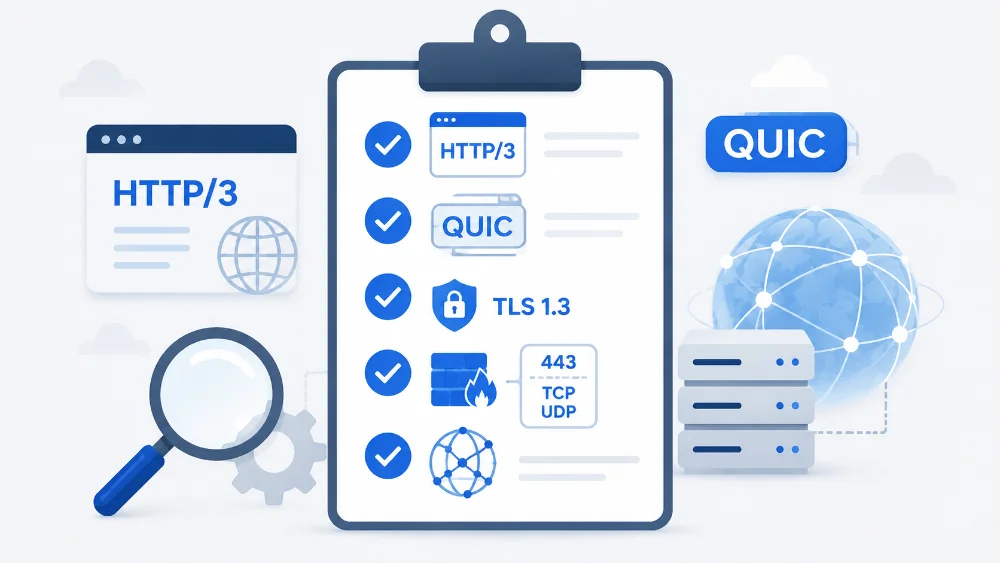
3) You will need a domain name and a valid, not self-signed, SSL certificate
4) You will need to use TLS 1.3. It’s sometimes beneficial to force TLS 1.3 as in the first example, adding ssl_protocols TLSv1.3. This is very appropriate, especially if only your own clients will be connecting to the instance, as opposed to a general website.
4) In your firewall, you need to open both TCP and UDP protocols for port 443
HTTP/3 uses UDP, unlike the previous versions of HTTP, which only used TCP. You will need to open TCP and UDP.
5) A modern web browser that supports Http/3 which is nearly all of them.
Also, TLS 1.3 was finalized in 2018. I do not even try to support older hardware. Requiring TLS 1.3 enhances security at the expense of a few older clients. If you do not explicitly require TLS 1.3, the client can then downgrade to HTTP/2 or HTTP/0.9, which may allow hackers to take advantage of the vulnerabilities in these older protocols. A good rule is to allow only TLSv1.2 and TLSv1.3 because TLSv1.1 is not only outmoded but also, according to Google.com, “… vulnerable to attacks, making it unsuitable for protecting sensitive data.”
ShellScript
ssl_protocolsTLSv1.2TLSv1.3;
If you are interested in this subject, you must check out “moz://a SSL Configuration Generator” that will generate all sorts of safer and more robust web server configs according to your preferences.
If you’ve ever experienced frustration when attempting to configure a reverse proxy, CloudPanel will simplify your life. CloudPanel is a free, no-frills hosting panel that is surprisingly robust and satisfying to use. It uses the Nginx server, ready for HTTP/3.
The self-hosting movement is in full swing, and CloudPanel is a perfect remedy for those of us who prefer a GUI hosting panel rather than using only the CLI. It excels at reverse proxies, even if—especially if—your project is Dockerized.
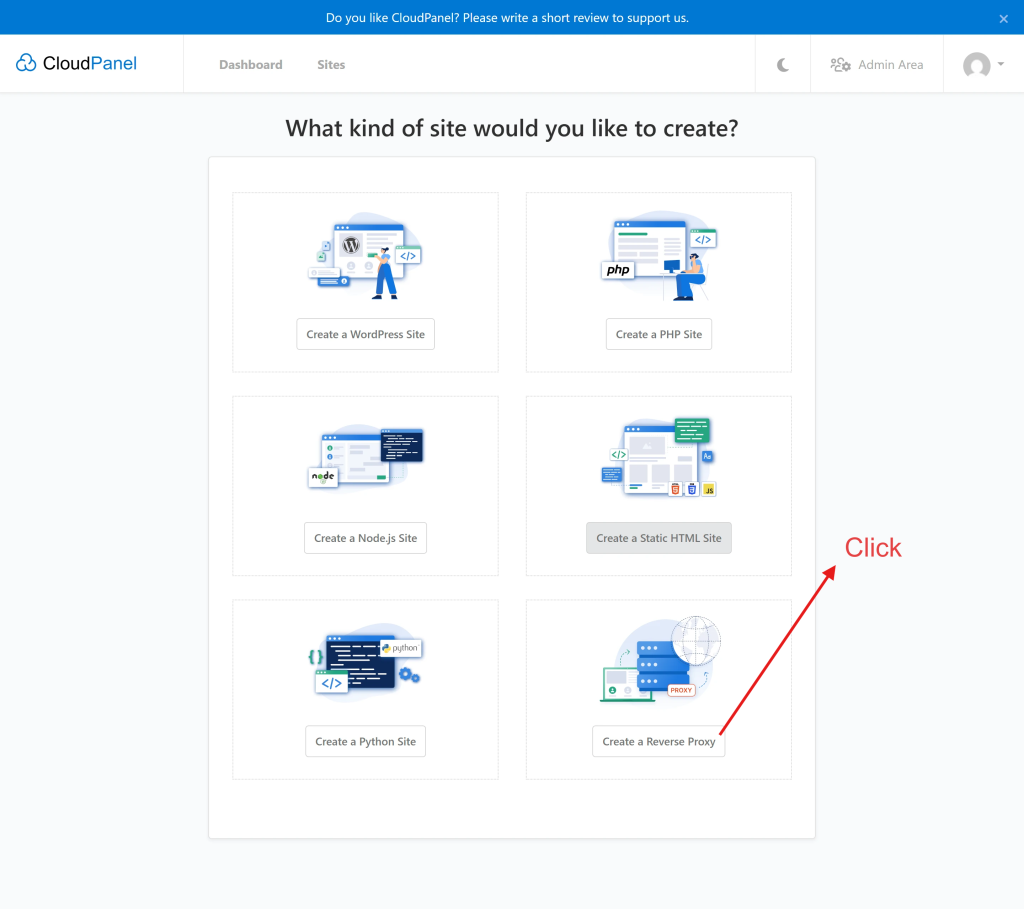
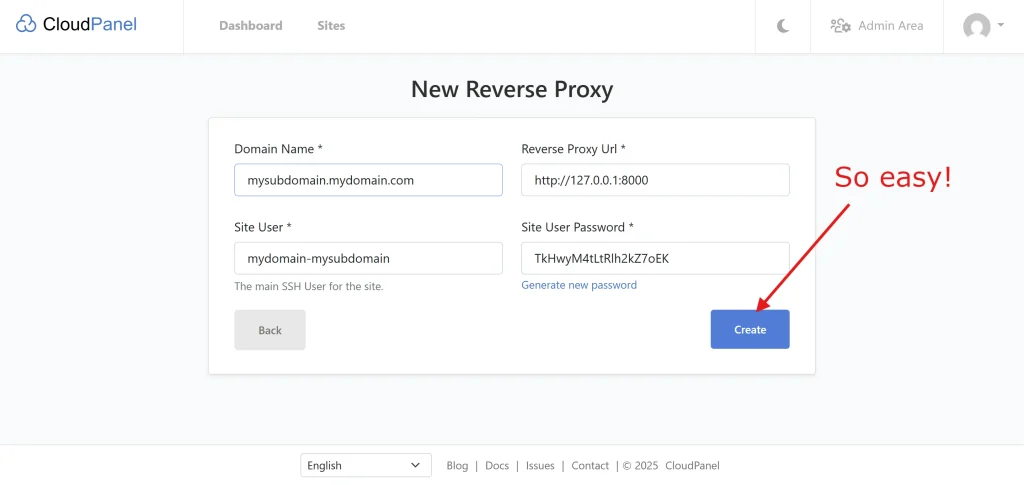
The best thing about CloudPanel is its built-in reverse proxy feature. CloudPanel will even add an SSL (Let’s Encrypt) certificate automatically, or you may import your own cert.
CloudPanel is so easy, in fact, I’m only going to post a few screenshots to explain everything you need to know.
You are halfway there!
Finished!
One final thing, you may want to turn on HTTP/3. Check out my blog post on how to use HTTP/3 in CloudPanel and Nginx.
So, you have installed Immich and are now realizing that it needs a reverse proxy or another method to add some security to your instance. OpenLiteSpeed to the rescue! This tutorial will help you configure OpenLiteSpeed (OLS) with your Immich app.
Immich is a fantastic Google Photos alternative if you are willing to self-host. While LightSpeed is “drop-in replacement for Apache,” OLS is not. OLS is from Mars; Apache is from Venus.
You may be wondering, if OLS is so quirky, then why use it at all? The answer is simple: speed, plus the fact that it is free. OLS supports HTTP/3, which will speed up our Immich instance immensely. For the record, Nginx also supports HTTP/3. Apache reportedly has an HTTP/3 module in development, but I can’t find the beta version anywhere at the time of writing.
Another reason to use OLS is because CyberPanel, a companion web hosting panel, is free (with frustrating adverts). It’s excellent for hosting a few websites free of charge. Not only will you get the speed of HTTP/3, but also a free SSL certificate, which is required for HTTP/3.
To make things a bit easier, you can create your website’s config files (vhost) using your hosting panel and install the corresponding SSL certificate using your (sub)domain. This way, we don’t have to create the website’s vhost configuration file from scratch.
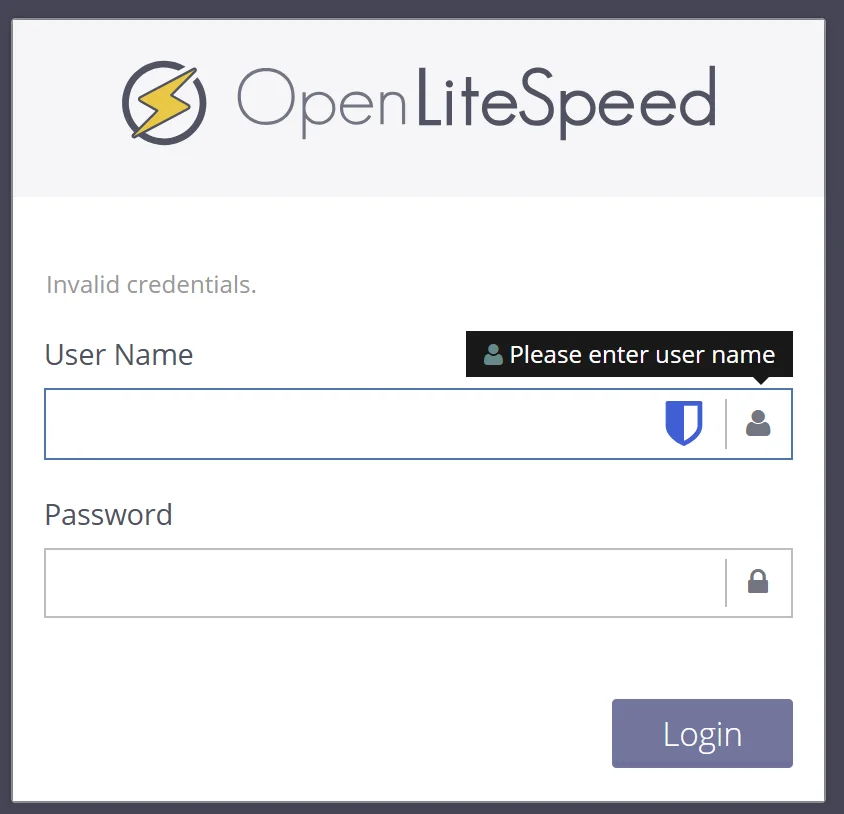
We have two methods to configure OLS: the OLS admin control panel or by editing the config files directly. OLS has a dedicated admin panel, which you will find hidden on port 7080, i.e., https://myserver.mydomain.com:7080. The username should be admin. If you have forgotten your password, SSH into your server and issue
OLS forgotten password
ShellSession
/usr/local/lsws/admin/misc/admpass.sh
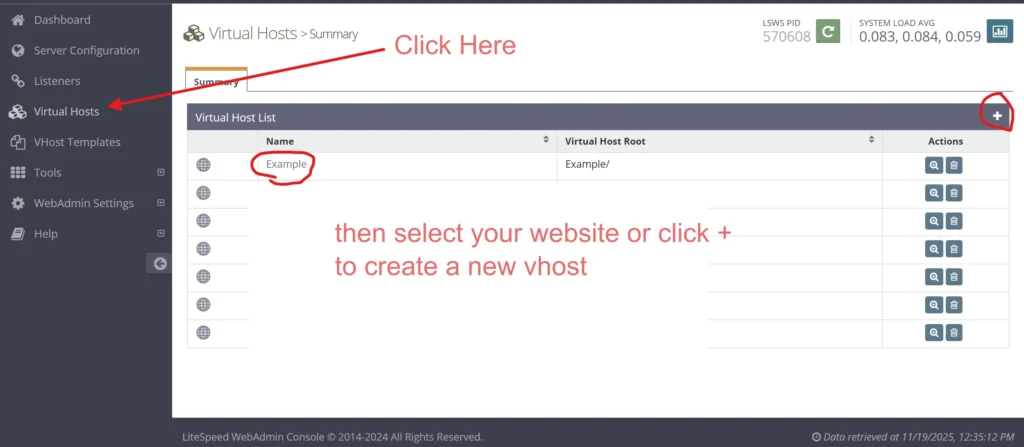
After you log in, click on Virtual Hosts. If you are starting from scratch, click on the + sign to create a new vhost. Otherwise, find and click on the website that you have already created for your Immich app.
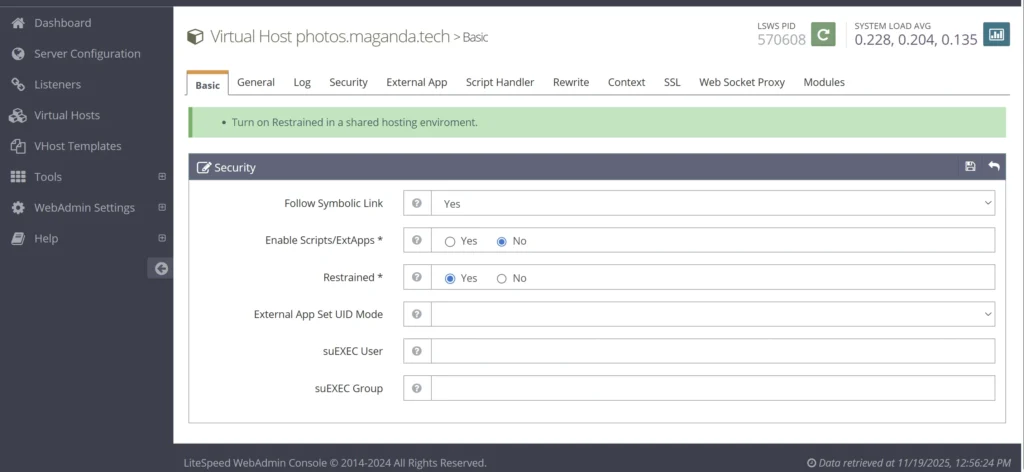
Under the Basic tab, select NO to Enable Scripts/ExtApps, and then select YES to Restrained.
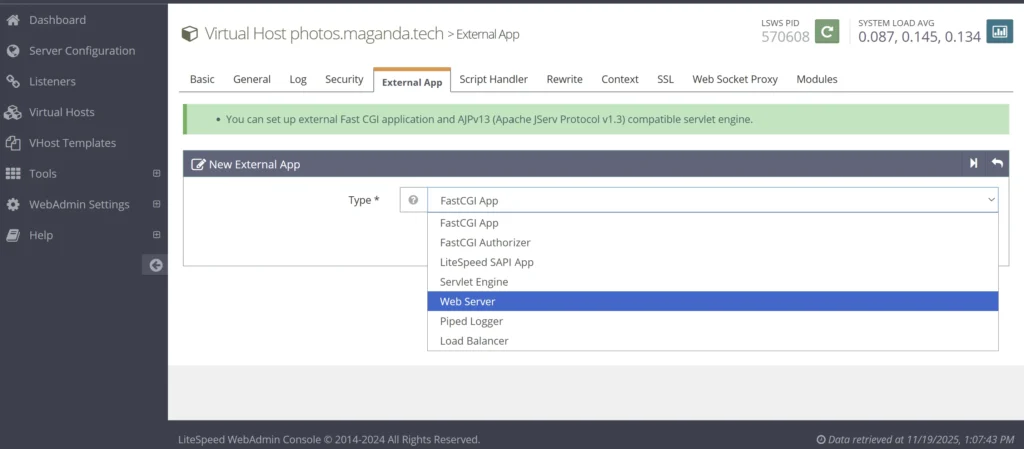
Next, select External App and select Web Server
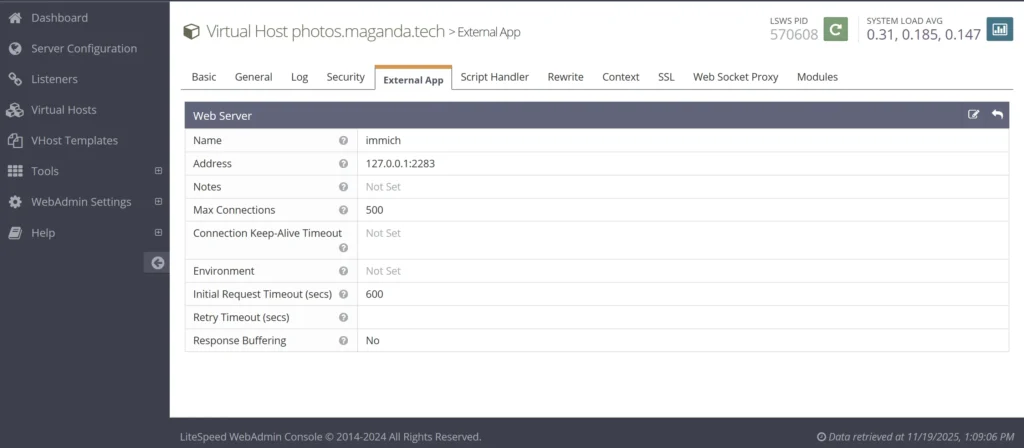
Add 127.0.0.1:2283 for the web server address and provide your web server a name. You can use the information listed below. Click save.
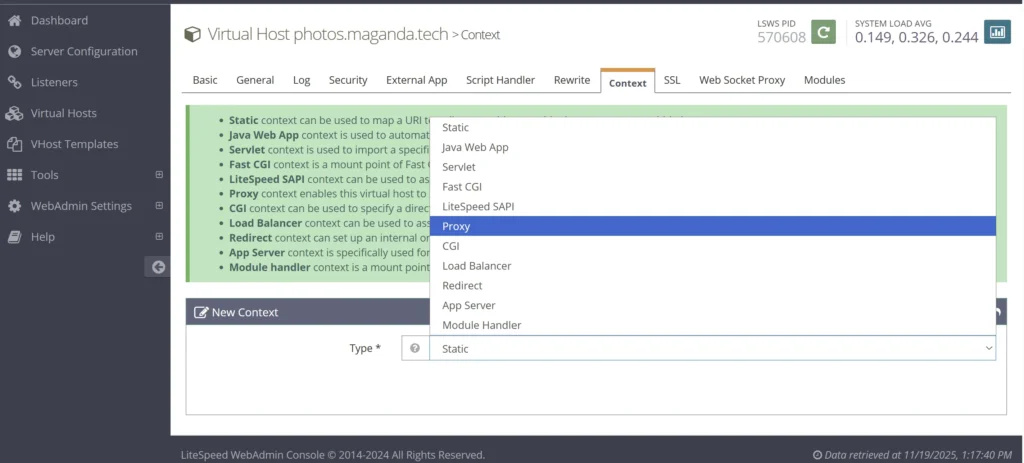
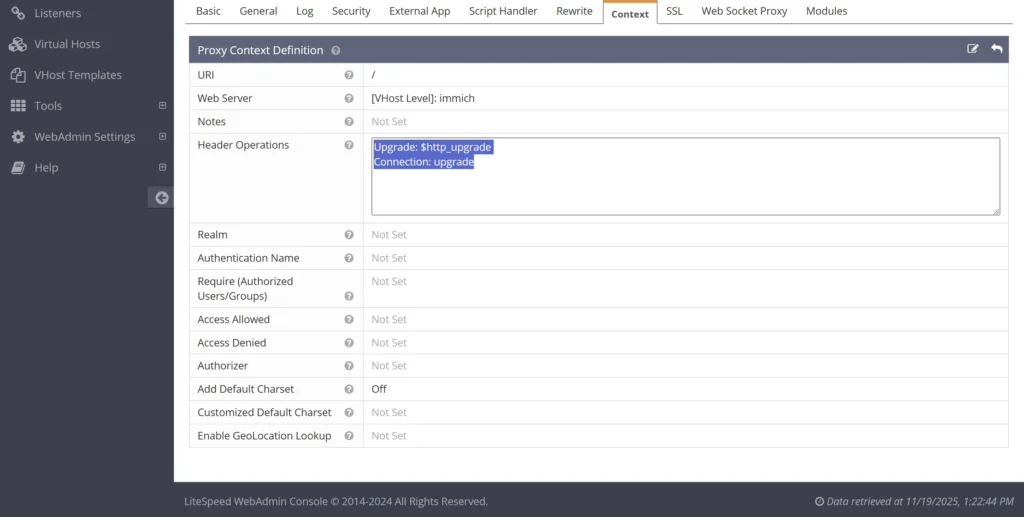
Click on Context, then create a new Proxy —click on Next
Enter / for the URL,
Upgrade: $http_upgrade Connection: upgrade
For the Header operations. Click save.
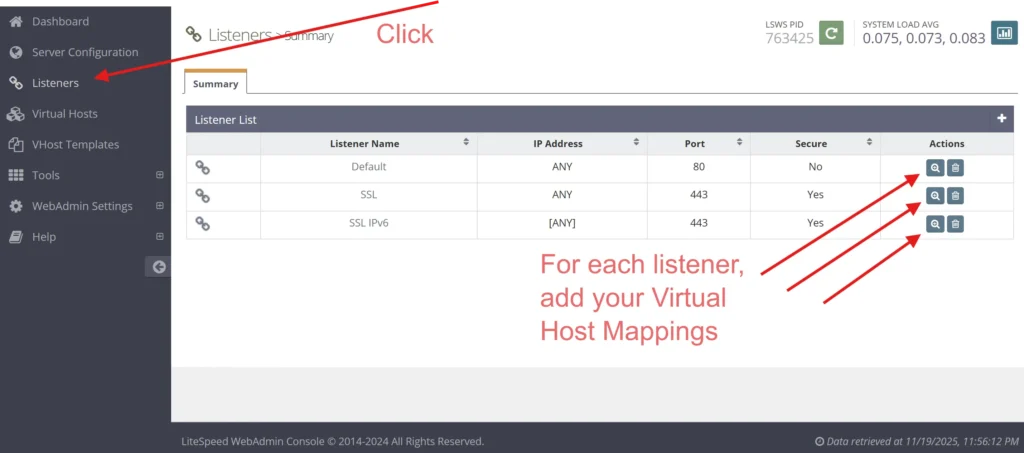
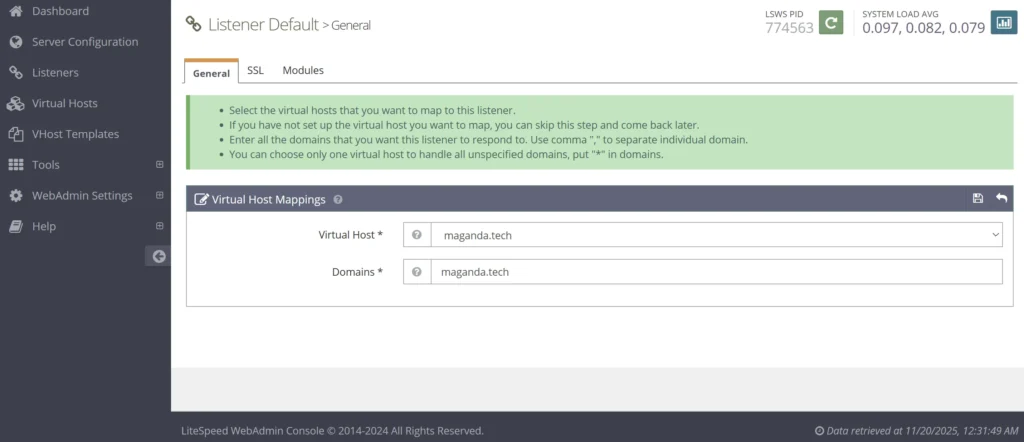
Click on Listeners, then add your virtual host to each listener type.
Our Immich virtual host would need to be added to all three listener types in the above example.
Finally, you need to restart the OpenLiteSpeed server. Look for the big green button at the top and restart OLS. That’s it!
Another word about listeners. If you’re a keen observer, you’ve likely noticed that my configuration lacks the IPV6 listener for the default port. If your system doesn’t have IPV6, then you probably only have two listeners. If you are using IPV6, you should generally have 4 listeners. Even your mail servers need IPV6. We can see here that CyberPanel seemed to forget my IPV6 for the default port. Is it a bug or a feature? I had to add this manually.
Here is the final vhost config for OLS. I assume that you can simply use this config instead of going through all of the above steps with the OLS admin panel… but I don’t know for sure. Please let me know in the comments what you think!
This is a lot of work for a simple reverse proxy. CloudPanel has a built-in reverse proxy, and so does AApanel, my favorite open-source hosting panel. For the record, I have given up on CyberPanel. The project appears to be all but abandoned, and there are too many adverts on the admin panel to make it usable or any bit enjoyable.